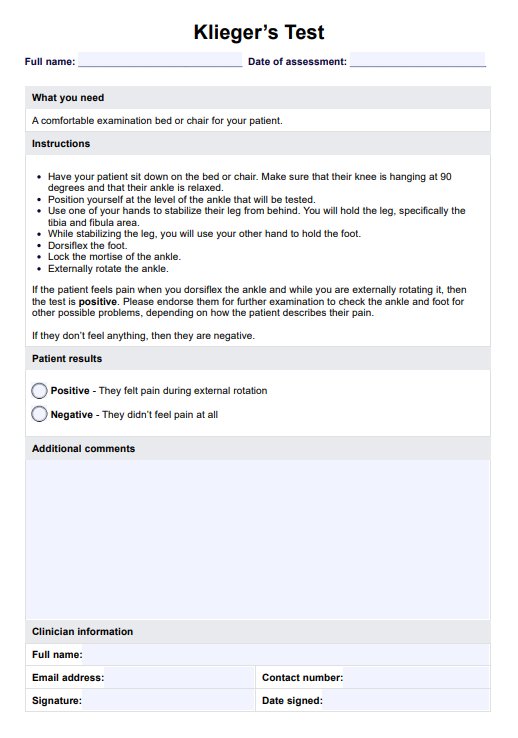
Klieger’s Test
If you have a patient complaining of ankle pain, you can perform the Klieger’s Test to see if their problem is a medial ankle sprain! Learn more about the test from this guide.
What is the Klieger’s Test?
An ankle sprain is one of the most common ankle injuries. It makes up 25% of sports injuries. Even non-athletes are susceptible to ankle sprains because they can happen anytime and anywhere.
If you take a step and awkwardly put weight on your foot, you could get an ankle sprain. If you’re walking or running, sometimes you might step awkwardly and bend/twist your ankle, making you trip. You can even sprain your ankle while asleep by awkwardly rolling your foot in the covers!
In worse cases, you have a high chance of getting an ankle sprain if your foot somehow gets trapped under heavy objects or if you get into a car accident.
You’ll know you (or another person) have an ankle sprain if there is pain or weakness in the ankle after twisting it and, more importantly, if you can’t even step down and put weight on it without groaning in pain.
While it can be obvious just by looking at a patient and how they walk, to properly ensure that they have a sprain, you can conduct the Klieger’s Test. This physical examination technique was developed to help healthcare professionals gauge patients for ankle sprains by applying pressure and external rotation to their ankles.
Check out this video to see how the Klieger's Test is performed:
Printable Klieger’s Test
Download this Klieger’s Test to assess patients for a medial ankle sprain.
How to conduct the Klieger’s Test
Before conducting the Klieger’s Test, you need to ensure that your testing space has a comfortable examination bed or a stable chair for your patient to sit on because this physical examination technique requires the patient to be seated. Other than that, you don’t need anything else but your own two hands. Once you have the bed or chair prepared, do the following:
- Have your patient sit down on the bed or chair. Ensure their knee is hanging by 90 degrees and their ankle is relaxed.
- Once your patient is seated, you must position yourself at the level of the ankle that will be tested.
- Use one of your hands to stabilize their leg from behind. You will hold the leg, specifically the tibia and fibula area.
- While stabilizing the leg, you will use your other hand to hold the foot.
- Dorsiflex the foot.
- Lock the mortise of the ankle.
- Externally rotate the ankle. What this does is it pries open the tibiofibular syndesmosis, which is an essential part of the ankle that helps stabilize it.
These are all the steps that you need to know and follow to properly perform the Klieger’s Test. Not so hard, huh?
How to interpret the results of the Klieger’s Test
Now that you know how to perform the Klieger’s Test properly, it’s time to learn what you need to know to assess the patient and give them the right designation.
During the part where you are externally rotating the ankle, the patient might feel pain. If the patient feels pain while you are performing this physical examination technique, then they are positive.
If they don’t feel anything, then they are negative.
If you give a patient a positive designation, it’s always best to endorse them for further examination, specifically orthopedists, if you aren’t one. They should help determine what to do for the patient, especially if they need surgery. They can even conduct other tests to check the ankle and foot for other possible problems, depending on how the patient describes their pain.
Klieger’s Test Example
The Klieger’s Test (nor most physical examination techniques) typically doesn’t come with a sheet where you can jot down your test findings. We at Carepatron took the liberty to create a Klieger’s Test sheet that allows you to do that! It contains the instructions, tickboxes for you to make your designation, and an additional comments box where you can write down your thoughts and observations regarding the patient’s ankle. It’s a nifty way of sharing results with other team members, especially those conducting further examinations and providing treatment.
Download this Klieger’s Test Example (Sample) here:

If you like what you see and think this will benefit your work, feel free to download it! It’s free! You can choose to print it and fill it out with a pen, or you can go paperless and just engage with the PDF.
When is the best time to conduct the Klieger’s Test?
The most appropriate time to conduct the Klieger’s Test on a patient is when they visit you for a consultation. If they bring up pain in their ankle, have them describe the pain and where it is located so you know what particular tests you should conduct. If they seem like they have a sprain (they have a difficult time walking and look like they are trying to avoid putting too much pressure on their foot), then the Klieger’s Test should be one of the tests you’ll perform.
Earlier, we mentioned that the next step is to endorse them for further examination, especially by an orthopedist. This is because the Klieger’s Test is a physical examination technique. It is a non-invasive assessment that doesn’t do anything but assess if the patient has a sprain. That doesn’t mean it’s unreliable, though. This is why the Klieger’s Test is usually included in a comprehensive examination because it can assess ankle sprains. The results will help you and your team what should be done next. Other physical examination tests can be performed to check for other problems, and imaging tests can confirm the severity of the ankle sprain or other problems.
Who can conduct the Klieger’s Test?
The Klieger’s Test instructions are simple to follow. Just looking at it, you’d think anyone can perform this test. However, even if the steps are easy, this physical examination technique should only be performed by healthcare professionals highly trained to deal with and treat musculoskeletal problems, especially in the lower extremities. These healthcare professionals would be:
- Orthopedists and orthopedic surgeons
- Podiotrists
- Physical therapists
- Occupational therapists
- Physiotherapists
- Chiropractors
- Rehabilitation specialists
- Athlete doctors
These professionals have a great and reliable understanding of the musculoskeletal system and are equipped to properly determine what problems patients are having and what can be done to treat them. They will know what tests to conduct besides the Klieger’s Test, and they can determine if an ankle just needs rest or if it needs surgery depending on the severity of the sprain or what other ankle problems the patient has.
Given that the Klieger’s Test is a physical examination technique that involves dorsiflexing and externally rotating the ankle, these professionals also know how to perform it safely and not cause unnecessary pain to the patient. Again, the instructions can make anything think that conducting this test is easy, but if you don’t know what you’re doing, you can end up aggravating or worsening the sprain or other pre-existing ankle conditions. So, it’s best to leave it to the experts.

Commonly asked questions
Yes. The results of a Klieger’s Test can help guide the next steps healthcare professionals can take to treat the patient. Depending on the findings, healthcare professionals might be compelled to try other tests to check for other possible problems, especially if the pain from the sprain is reaching beyond the tibia and fibula.
In a sense, yes. It is a safe procedure, but it requires the professional to dorsiflex and externally rotate the patient’s ankle, which, if they have a sprain, could cause pain. Knowing the severity of the pain is needed in order to determine what to do next after the test. But patients shouldn’t be afraid because the professional will conduct this test safely so they don’t feel more pain than necessary for the assessment.
Yes, but it should not be performed on patients with joint deformities or arthritis. These conditions could affect the accuracy of the results, so if the patient has such deformities or arthritis, they should undergo other tests instead of this.
What are the benefits of the Klieger’s Test?
It is an inexpensive test to conduct.
The Klieger’s Test is a physical examination technique, so it doesn’t require any special equipment from the healthcare professional to be performed. You only need a chair or an examination bed, and you’re all set.
Not only is it inexpensive, but it is also easy to perform. The instructions are simple so healthcare professionals won’t have a difficult time performing the technique. It can also save the professional some time because this test can be accomplished within a minute or two.
The results of the test can help guide treatment decisions.
The Klieger’s Test may only provide “surface-level” results, but these results are still valuable because they can help determine what a team needs to do next. Let’s say your patient’s ankle has a sprain (evident when the patient entered the consultation room limping and having a hard time walking, and the Klieger’s Test confirmed it through pain while externally rotating the ankle). Normally, the pain will be medial but may sometimes reach the interosseus membrane near the tibia and fibula. But for this patient, the pain has reached beyond that. It’s likely the sprain is extreme, or other problems are contributing to it. You can endorse them for further examination to confirm the pain's severity and determine if other issues are contributing to the pain, such as different physical examination techniques and imaging tests. From there, you and your team can decide if the ankle simply needs rest or perhaps surgery is necessary, considering the severity of the pain.
It can be performed again to monitor the patient.
Let’s stipulate that your team has developed and implemented a treatment plan for a patient with an ankle sprain, and the pain that this ankle sprain causes reaches the area of the tibia and fibula. You can perform the Klieger’s Test on them again during a scheduled check-up to check if the pain is still the same, is worsening, or is no longer there. If the pain is becoming less or if it’s not there anymore, then great! Your patient is getting better, and your treatment plan seems to have worked! If the pain is still the same or it somehow worsens, you may have to adjust your plan and see if the changes will help.
Why use Carepatron for orthopedic and physical therapy-related work?
If you are a healthcare professional specializing in orthopedics, podiatry, or physical therapy, then you will enjoy browsing the Carepatron platform! We have features that you will surely find to be valuable.
One of our defining features is our library of resources. It’s filled to the brim with worksheets, assessments (including the Klieger’s Test!), survey templates, progress note templates, general treatment plan templates, and much more! It also covers numerous healthcare fields, including orthopedics, physical therapy, and adjacent practices!
Remember our point about including the Klieger’s Test in a comprehensive examination? If you browse our resource library, you will find other assessments to gauge a patient’s ankle, like the Silfverskiold Test, another physical examination technique. Feel free to download as many resource templates as you want and need! If they help you get better pictures of your patients, then we’re happy.
We also have a nifty storage system that you might want to take advantage of. This system will allow you to store your clinical documentation in a HIPAA-compliant manner! If you downloaded our Klieger’s Test sheet template, you can store filled-out copies with us. Doing so essentially creates backups of your files, so if you lose their physical versions, you can download them from the storage and reprint them. You can even set up the access permissions for your files. You should share them with your whole crew to easily share results with them, and vice-versa!
We at Carepatron are all about helping healthcare professionals with their work, so take advantage of our platform so we can help streamline your workflows and help you preserve your work!
