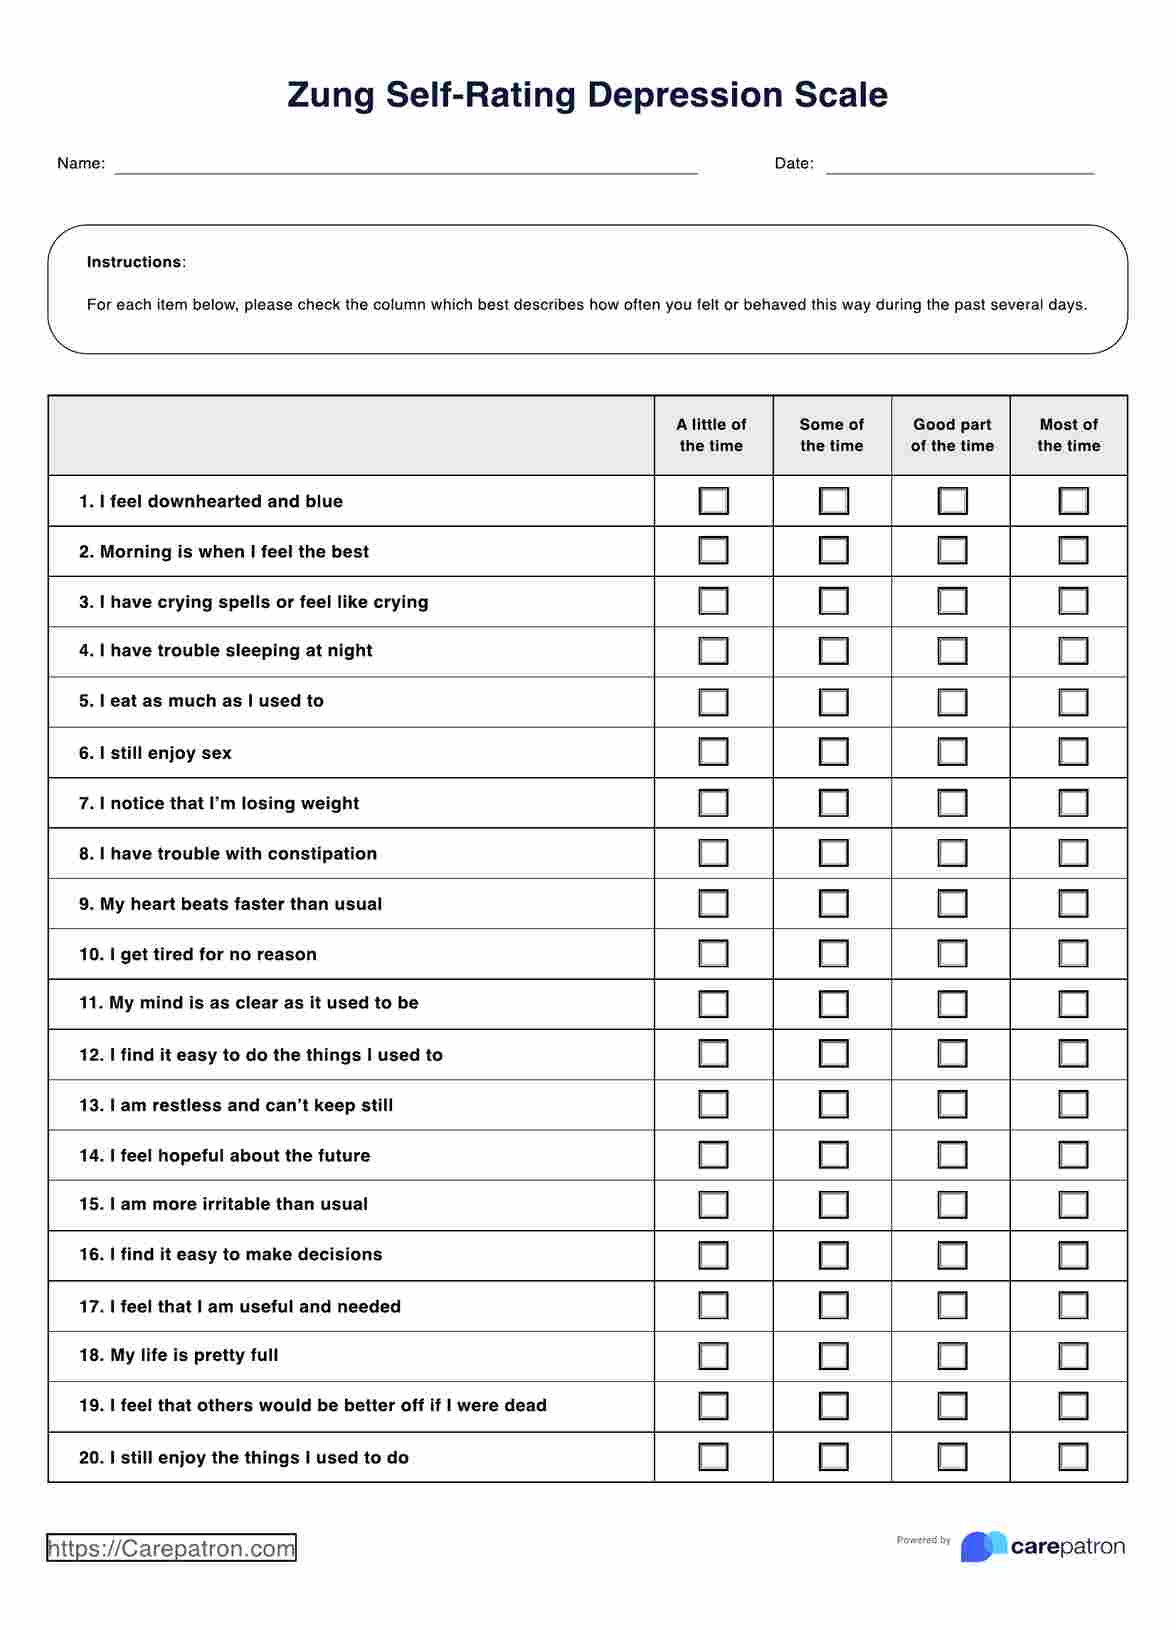
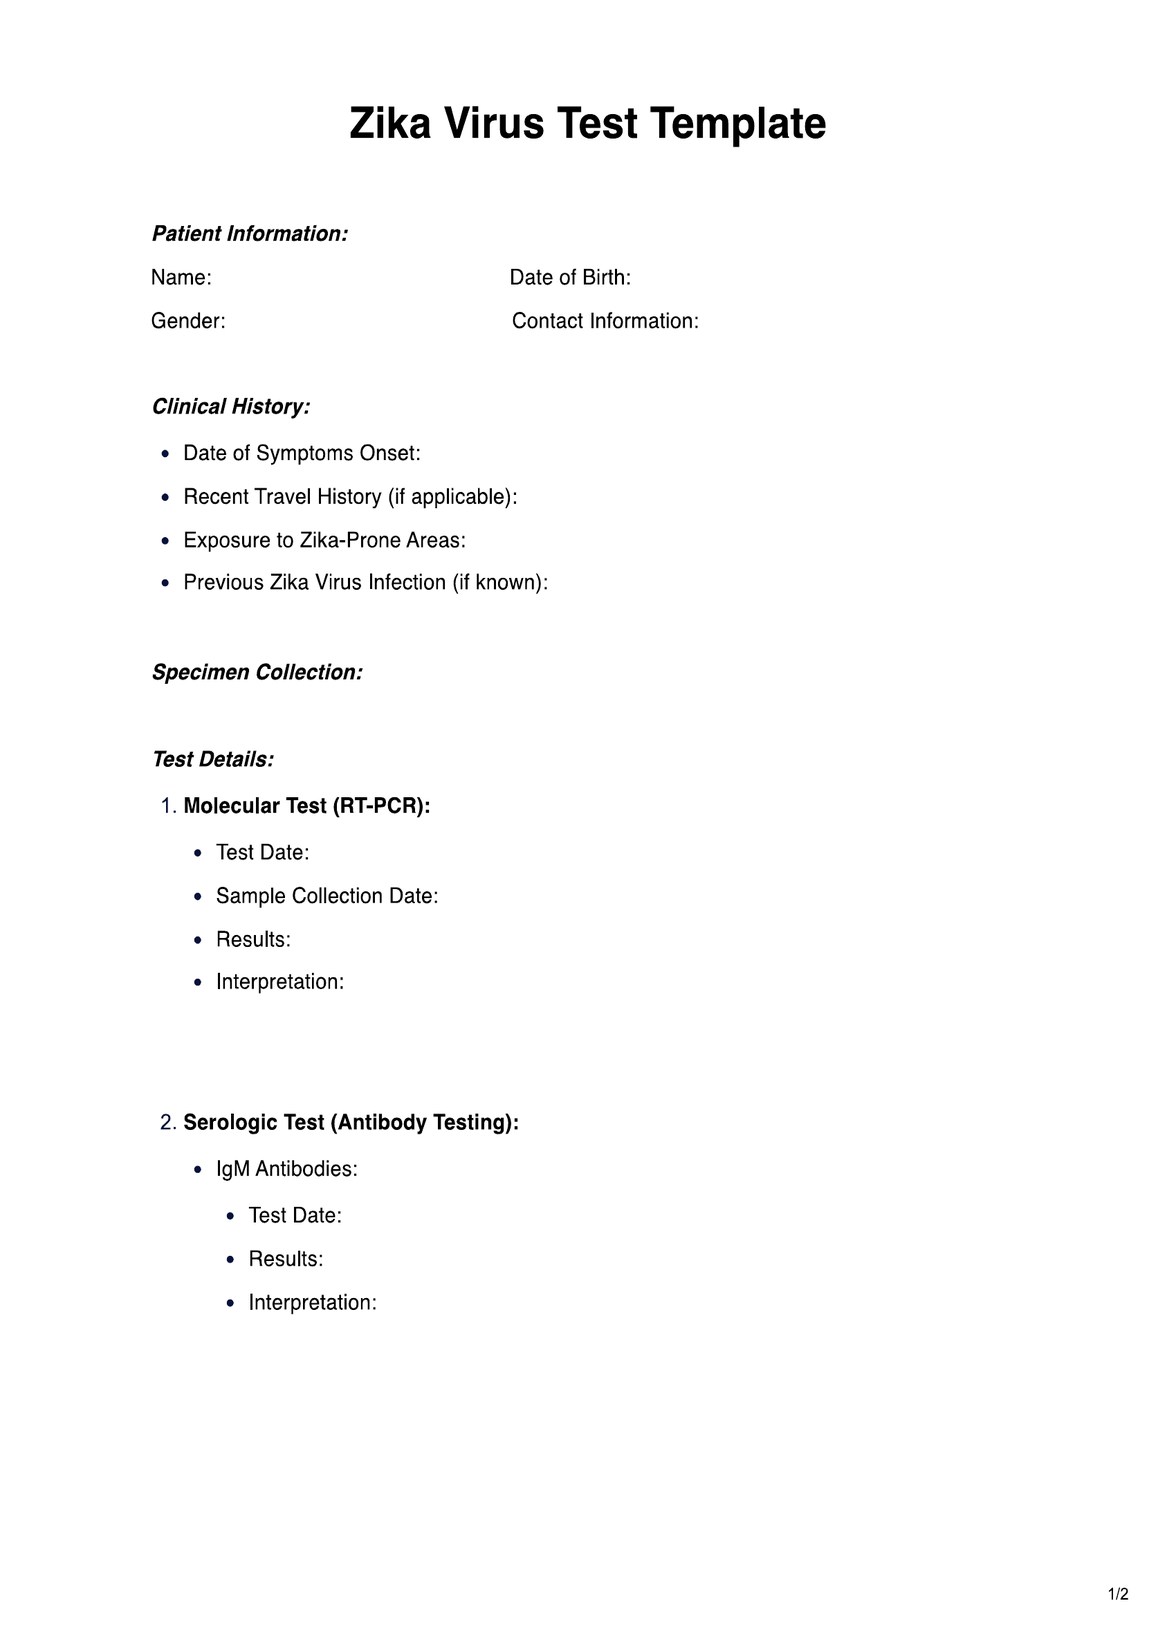
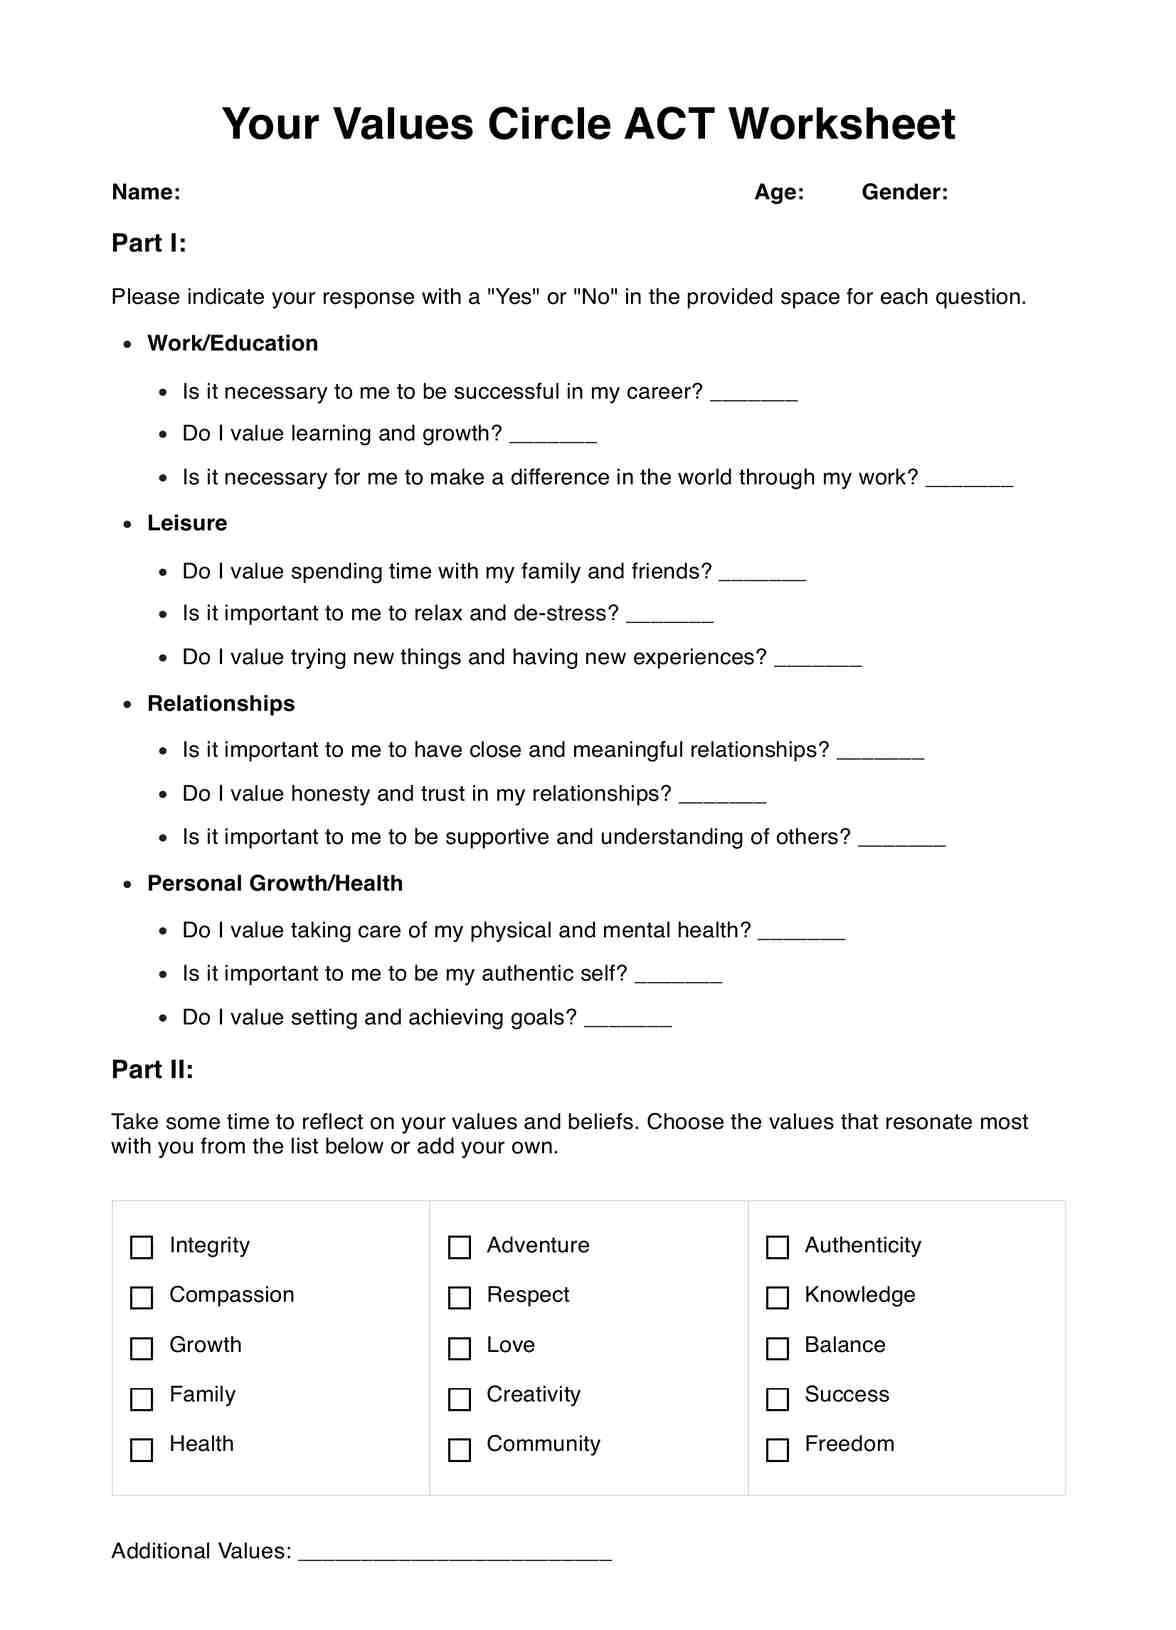
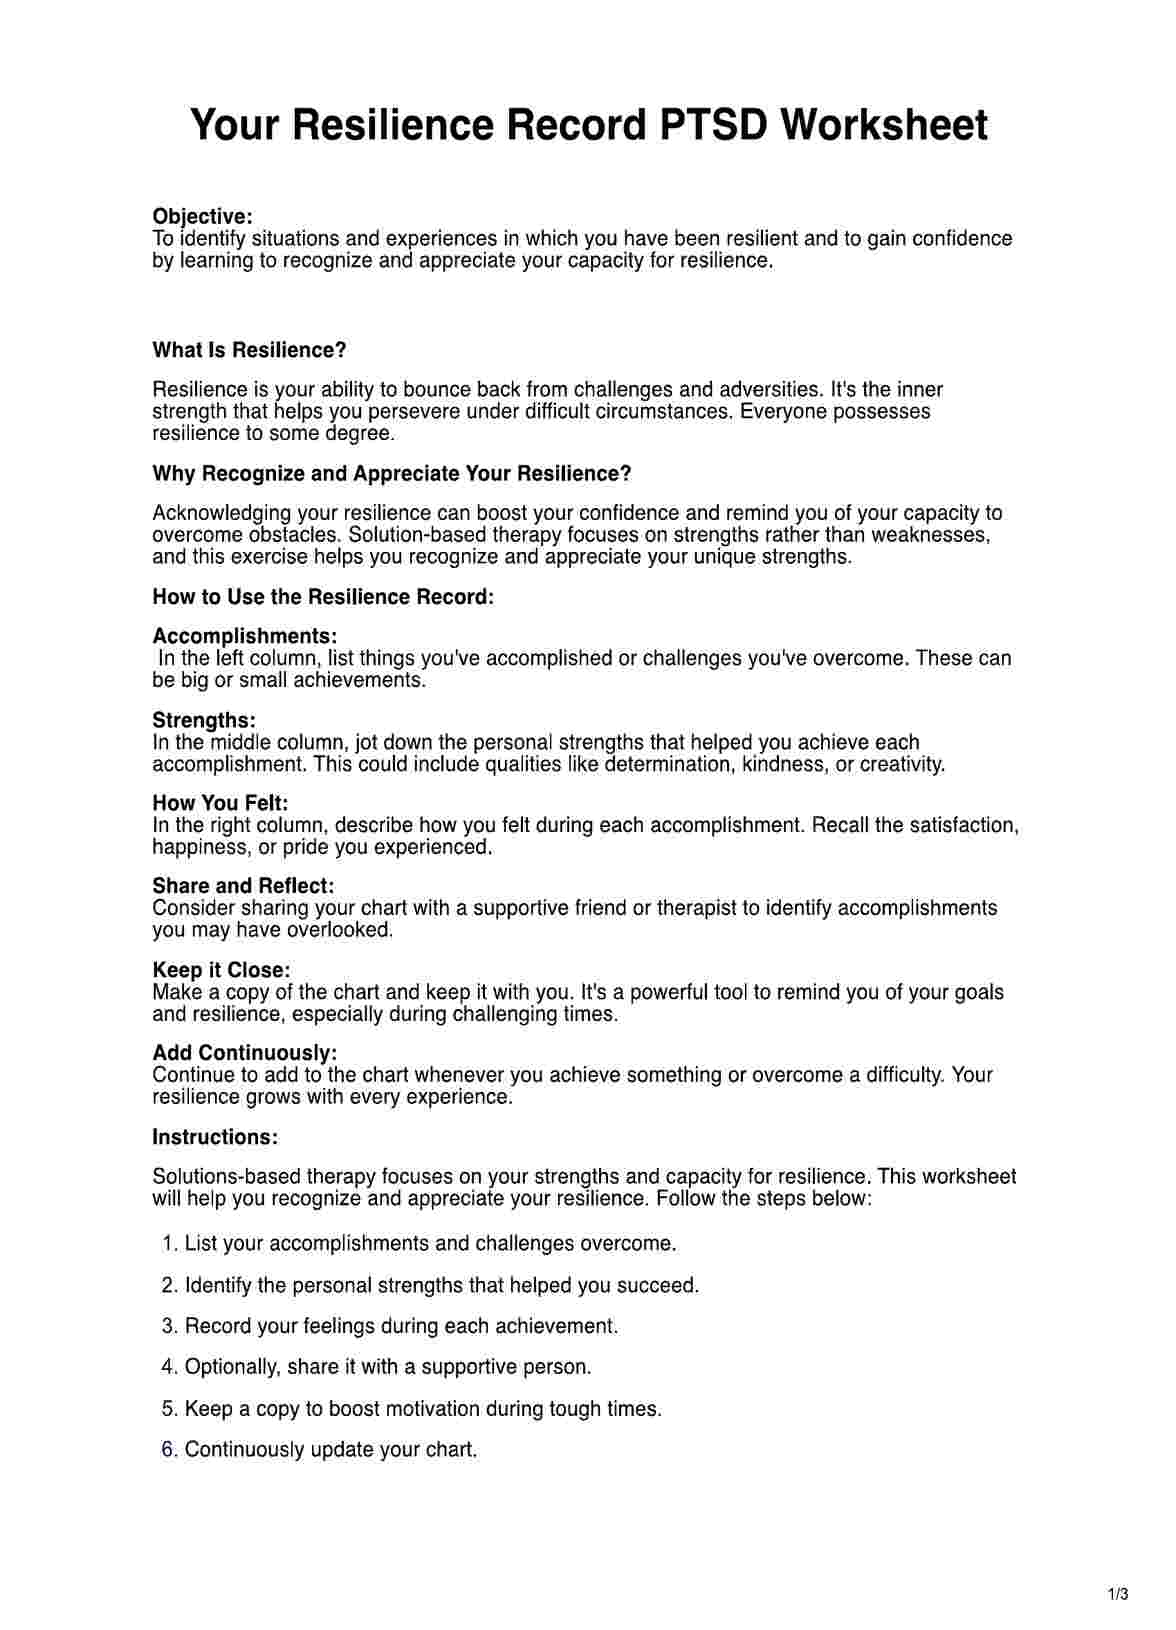
Speed’s Test

Does your patient have shoulder pain? If so, one of the best ways to help you identify what possible shoulder condition they are dealing with is to conduct the Speed’s Test, which is mainly for checking if the patient possibly has superior labrum tears and or biceps tendinopathy. Learn more about it through this guide!

By Matt Olivares on Apr 08, 2024.

Fact Checked by RJ Gumban.

Use Template

What is the Speed’s Test?

Before discussing the , let’s talk about the two kinds of shoulder problems that it seeks to identify: Superior Labral Tears (also known as SLAP Lesions) and Biceps Tendonitis.

A Superior Labral Tear is an injury of the shoulder’s glenoid labrum, which is the part of the shoulder that serves as a stabilizer for the glenohumeral joint. Besides being a stabilizer, it works to resist anterior and posterior movement and prevent the shoulder from being dislocated or subluxated when it reaches its farthest range of motion.

If a patient is dealing with a Superior Labral Tear, they are likely to have the following symptoms:

  • They can’t lie down on their affected shoulder because of the pain
  • Whenever they move their shoulders, they feel painful clicking and/or popping
  • They feel pain whenever they try to make overhead motions with their shoulder

Superior Labral Tears are normally caused by falling onto an outstretched arm, when the arm is forcefully pulled, and when a shoulder is dislocated.

On the other hand, Biceps Tendonitis is a shoulder condition characterized by an inflammation of the biceps tendon. During the early stages of the tendonitis, the biceps are inflamed and swollen. Over time, if left untreated, it thickens and, if it gets damaged, it can result in a tear.

If a patient is dealing with Biceps Tendonitis, they likely have the following symptoms:

  • There is pain in the shoulder
  • The shoulder has reduced range of movement
  • Their shoulder looks swollen
  • There is a Popeye’s bulge in the upper arm

Biceps Tendonitis is a normal part of our lives because of the wear and tear the biceps undergo as we age. Strenuous activities that involve the arms can also contribute to wear and tear.

In order to determine the possibility that a patient is dealing with either of the aforementioned shoulder problems, healthcare professionals often perform physical examination techniques. One such technique is the Speed’s Test, which is a physical examination technique that the professional and patient will do together. It involves raising the arm and exerting resistance as it rises. It’s a technique that was developed to assess the integrity of the biceps tendon or labrum and identify the possibility of Superior Labral Tears and Biceps Tendonitis.

Check out this video to see how the Speed's Test is performed:

Printable Speed’s Test

Download this Speed’s Test to assess shoulder pain in your patients.

How to perform the Speed’s Test

The Speed’s Test is one of the simplest physical examination exercises for the shoulder. It is a non-invasive test and doesn’t require any equipment from the healthcare professional. The instructions are also simple enough that this test can be accomplished quickly!

Most physical examinations involve the patient just lying down, sitting, or standing, and the healthcare professional will manipulate limbs or apply pressure on certain parts of the body. But this one isn’t like any of those because it is collaborative!

To perform this test correctly, follow these instructions:

  • Have your patient supinate their affected arm.
  • Have them slowly raise their arm to reach up to 90 degrees flexion.
  • While the patient slowly raises their arm, you will apply resistance as they push up.
  • Tell your patient to also apply resistance to counteract yours as they raise their arm.
  • This ends once the arm reaches 90 degrees flexion.
  • Next, you will repeat all of these, but this time with their arm pronated.

There is an “alternate” method for this test. What you can do is to set the arm immediately in a certain degree of flexion. It can be 60 or 90. It’s up to you. Once the arm is set to a flexion of a certain degree, the patient just needs to raise their arm to 90 or keep it at 90 degrees flexion, and you need to apply resistance as they raise or maintain it. The patient must also counteract your resistance with theirs. Like with the regular test method, you must perform this while the arm is supinated, and repeat it with the arm pronated.

How to interpret the findings of this test

Like most physical examination techniques, the Speed’s Test has no numbers to crunch. To get results for this test, you need to observe if the patient’s arm is weak or if the patient mentions pain while raising their arm and applying resistance to counteract your resistance.

Let’s consider pain first. If the patient complains about pain in the humerus region, then the patient might be dealing with Biceps Tendonitis.

Now, if the arm is weak, that might be a sign that the long head of the biceps tendon is torn.

There might also be a chance that they have Superior Labral Tears, so if they are in pain, recall the symptoms mentioned earlier and ask if the patient has those symptoms.

If the patient feels pain in the bicipital groove while the arm is supinated, the test is positive.

If the patient’s arm is weak, the test is also positive.

If the patient doesn’t feel pain and exhibits strength when you apply resistance to them while supinated and pronated, then the test is negative.

If the test is positive, the next step is to endorse the patient for further examination to check for other possible problems and to confirm the results of the Speed’s Test.

Speed’s Test Example

Since the Speed’s Test is a physical examination technique, it normally doesn’t come with a sheet to record findings. Given this, we at Carepatron took the liberty of creating a sheet template for this test! Our sheet contains the instructions on how to perform the test, descriptions of what counts as positive and negative (it even has tick boxes for you to make a designation!), and an additional comments box to discuss your findings and indicate whatever decisions and reasonings you make.

Download this Speed’s Test Example (Sample) here:

Speed’s Test Example

If you like what you see and believe that our template will help you document your Speed’s Test results, feel free to download it! It’s free! You can choose to print it and fill it out with a pen, or you can go paperless and engage with the editable or “interactive” aspects of the PDF!

When is it best to conduct the Speed’s Test?

Let’s say that a patient schedules an appointment with you to discuss pain in their upper extremities. When they present themselves to you, they talk specifically about shoulder pain. If they mention any of the symptoms for Superior Labral Tears or Biceps Tendonitis, then that’s your cue to conduct the Speed’s Test.

It’s best that you conduct the test immediately to see if the patient is possibly dealing with Superior Labral Tears or Biceps Tendonitis. Most of the time, these problems can heal with enough rest and rehabilitation, so patients might shrug it off and let it pass. “Time heals all wounds,” so they say. But there are cases of Superior Labral Tears and Biceps Tendonitis that require surgery to fix, so after the Speed’s Test, you have to endorse them for further examination.

Speaking of further examination, the Speed’s Test is often included in comprehensive examinations. Now, despite its positive and negative designations, it is not a diagnostic test because it doesn’t confirm specific problems. That doesn’t mean it is unreliable or useless. It is quite useful because it can identify the possibility of certain problems. The results will serve as grounding for a wider team to determine what other tests should be conducted.

If the patient tests positive, other members of the team will know what tests to conduct to confirm the problems and to detect others. Superior Labral Tears and Biceps Tendonitis usually come with other problems, like shoulder instability, shoulder impingement, and more.

What are the benefits of the Speed’s Test?

It’s an inexpensive and easy test to accomplish.

One of the great things about the Speed’s Test is that it doesn’t require anything from the professional other than their hands because all the professional needs to do is exert resistance while the patient is attempting to raise their arm to 90 degrees of flexion or maintain their flexion while counteracting your resistance with their resistance. The instructions are straightforward, so that this test can be accomplished within five minutes! You can even conduct this anywhere, though it would still be best to do this in a clinical setting.

It can direct the course of examinations and treatments.

The Speed’s Test is often included in comprehensive examinations. It can even serve as a great starting test because it’ll determine the possibility of Superior Labral Tears and Biceps Tendonitis. By identifying the possibility of either based on the patient’s pain and/or weakness in their shoulder and arm, other members of a wider team can determine what other tests they should conduct besides imaging tests because those two potential problems normally come alongside others. The test results, if confirmed by imaging tests, can be used as directives to determine what goes into a patient’s treatment plan as well. Do they need rehabilitation? Do they simply need to rest and just let time pass? Or, do they need surgery? The results should answer these questions.

It can be used to monitor the patient.

Let’s say that your team already developed and implemented a treatment plan for your patient’s shoulder. Naturally, you’d want to know how they’re doing from time to time. What you can do is to schedule routine check-ups. Those are the perfect times to repeat the Speed’s Test. Doing so will allow you to find out whether they are still in pain. If they feel less pain or no pain at all, and if their arm has regained a bit or all of its strength back, the patient is getting better, and your treatment plan seems effective. If they still feel the same amount of pain or it somehow got worse, and if their arm still feels weak, you might want to adjust your plan. Perhaps the changes might do the trick.

Why use Carepatron for orthopedic and physical therapy-related work?

If you happen to be a physical therapist, orthopedist, or an adjacent healthcare professional, then we ask that you take the time to check out the Carepatron platform. We’re sure you will find something to benefit you and your work!

One of the features that we are most proud of is our resource repository. It houses a massive amount of worksheets, assessments, survey templates, form templates, general treatment plans, and a whole lot more! It even covers numerous healthcare fields, including physical therapy and orthopedics.

Since we mentioned that the Speed’s Test is normally part of a comprehensive examination, we’d like you to know that we have templates for other physical examination techniques specifically for assessing shoulders, such as the Shoulder Abduction Test and the Clunk Test. Feel free to download our templates and add them to your examination if you think they’re helpful.

We also have a storage system that allows you to store clinical documents with us in a HIPAA-compliant manner! If you downloaded our Speed’s Test template, you can store filled-out copies with us and set who can access them besides you. We recommend sharing access with your teammates if you’re part of a wider team. Doing so will allow all of you to share results easily.

We at Carepatron are committed to helping healthcare professionals with their work, so take advantage of our platform so we can find ways to streamline your workflows and help you preserve your work!

Physical Therapy Software
Who made the Speed’s Test?

Commonly asked questions

Who made the Speed’s Test?

The person who developed the Speed Test is Spencer Speed, who is said to have developed the test based on the pain he felt in his shoulder while performing the Straight Leg Raise Test on a patient with an outstretched arm. Pretty clever and fortuitous, if you ask us.

How long does it usually take to accomplish the Speed’s Test?

Given that the instructions are simple and easy to pull off, it should only take 1 to 5 minutes, and that’s for testing the arm in both supinated and pronated positions.

Is the Speed’s Test painful?

Yes, in the sense that the test should reproduce the pain that the patient feels in their shoulders. Whatever pain they feel during this test will be due to pre-existing conditions. Given that, healthcare professionals should exert a right amount of resistance during this test so as not to aggravate the problem.

Join 10,000+ teams using Carepatron to be more productive

One app for all your healthcare work