How to conduct the Functional Reach Test?
The Functional Reach Test is easy to conduct or administer. You simply have to follow the steps below.
Step 1: Prepare equipment and tools beforehand
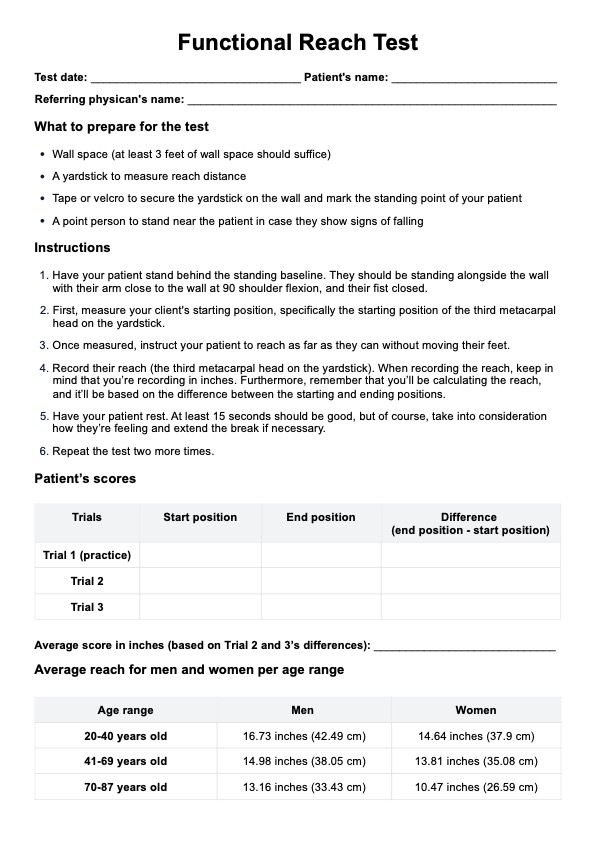
To conduct the test effectively, you must prepare the following: wall space (at least 3 feet of wall space should suffice), a yardstick to measure reach distance, tape or velcro to secure the yardstick and mark the patient's standing point of your patient, someone to stand near the patient in case they show signs of falling and the Functional Reach Test template you can download in the guide. In case you forget, there's also a list of what you must prepare on the template.
Step 2: Have your patient stand behind the standing baseline
After all the necessary tools are ready, the first thing you need to do is have your patient stand behind the standing baseline. They should be standing alongside the wall, with their arm close to the wall at 90 shoulder flexion and their fist closed. This setup allows you to measure balance stability as the patient reaches forward accurately.
Step 2: Conduct the test
The Functional Test has three trials, the first being a demonstration. Here’s how it’s supposed to go:
- You’ll first measure the starting position of your client, specifically the starting position of the third metacarpal head on the yardstick.
- Once you measure that, instruct your patient to reach as far as they can without moving their feet.
- Record their reach, a.k.a the third metacarpal head on the yardstick. When recording the reach, keep in mind that you’re recording in inches.
- Have your patient rest. At least 15 seconds should be good, but of course, take into consideration how they’re feeling and extend the break if necessary.
Keep in mind that you'll be calculating the reach and it'll be based on the difference between the starting position and end position.
Step 3: Repeat the trial two more times
The first test is mainly for demonstration purposes. You'll record the second and third tests, but you may also include the first test result in your final score if you wish.
Do remember to give your client breaks in between each trial and to stop the test if the patient falls forward or if their feet are lifted up from the floor.
Step 4: Calculate the averages
Once you have the results of the second and third trials (again, you can count the first one if you wish), calculate the average.
Just to give you an idea, here are the average reaches for both men and women of specific age groups:
- 20-40 years old: 16.73 inches (42.49 cm) for men, 14.64 inches (37.9 cm) for women
- 41-69 years old: 14.98 inches (38.05 cm) for men, 13.81 inches (35.08 cm) for women
- 70-87 years old: 13.16 inches (33.43 cm) for men, 10.47 inches (26.59 cm) for women
Do note that the normative Functional Reach Test values may vary depending on the population being tested.
Step 5: Interpret the scores
Refer to the information below when you're interpreting the average Functional Reach Test score:
- Extremely high risk (8x the risk): Patient is unwilling to reach
- High risk of falling (4x the risk): Average score of 6 or below inches
- Moderate risk of falling (2x the risk ): 7-10 inches
- Low risk of falling: Score an average above 10
Once you’ve calculated the average of the Functional Reach Test results, you can use that to help determine parts of the developed care plan for your patient to address specific balance deficits and improve overall stability. Do note that in some settings, a computerized Functional Reach Test is used to enhance accuracy and provide a detailed analysis of the results.